How to use Google Maps Street View

 This is my fourth tutorial covering features of the Google Maps API v3. This time I will show you how to use the street view service. I have built an app for this tutorial, an interactive visit of Paris. You’ll be able to visit certain locations, walk through Paris or take virtual tours.
What google maps features are covered in the tutorial?
- Adding a map to your site
- Using the directions service
- Using the street view service – used to show a 360 view of various places
Prerequisites
The application is built using html, php and javascript. It would be best if you had some basic knowledge of these.
What are we going to build?
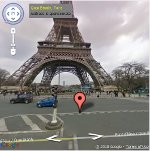
We’re going to build an interactive visit of Paris. The visit starts in front of the Eiffel tower. To continue, a user can walk through the city, go directly to certain locations highlighted on the map, or take a tour of the islands (Ile de la Cite and Ile Saint Louis).
You can view the app here! And also download the source code from here.
Creating the layout for our app
We’ll use a simple layout. We’ll show a title and some info about our app at the top of the page. Below that we’ll add three columns, one for the Paris map, one for the street view and one for steps from the islands tour.
Here’s how the code looks like:
Paris Visit
-
Move directly from the street view
- Take a tour:
Move the pegman on the map to choose a location - some ideas are already marked
The map_canvas1 div will be used to hold the map, the map_canvas2 div is for the streetview and the directions div is for the showing the steps in the tour. As you noticed, the initialize function is called after loading the page, the function will show the map and street view. Let’s see how it looks like.
Showing the map and streetview
We will first have to include the google maps api, like so:
The initialize function looks like this:
// the function called when the page loads; it shows the map and street view
function initialize()
{
// coordinates for the center of the map
var mapCenter = new google.maps.LatLng(48.85893528,2.2933412);
// options for the map
var mapOptions = {
center: mapCenter,
zoom: 12,
mapTypeId: google.maps.MapTypeId.ROADMAP,
streetViewControl: true
};
// create a new map object to be shown in the map_canvas1 div elements and with the options that were set
map = new google.maps.Map(document.getElementById("map_canvas1"), mapOptions);
// options for the panorama
panoramaOptions = {
addressControl: true,
addressControlOptions: {
style: {backgroundColor: 'grey', color: 'yellow'}
},
position: mapCenter,
pov: {
heading: 140,
pitch: +10,
zoom: 1
}
};
// show the panorama in the map_canvas2 div element with the options that were set
panorama = new google.maps.StreetViewPanorama(document.getElementById("map_canvas2"), panoramaOptions);
// set street view for map
map.setStreetView(panorama);
// add marker for tour eiffel
// on map
var marker = new google.maps.Marker({
position: mapCenter,
map: map,
title:"Paris visit starts here!"
});
google.maps.event.addListener(marker, 'click', function() {
panorama.setPosition(mapCenter);
panorama.setPov({heading: 140, pitch: +10, zoom: 1});
});
// on panorama
var markerPanorama = new google.maps.Marker({
position: mapCenter,
map: panorama,
title: 'Tour Eiffel'
});
// add notre dame marker
// on map
var positionNotreDame = new google.maps.LatLng(48.853499,2.348090);
var markerNotreDame = new google.maps.Marker({
position: positionNotreDame,
map: map,
title:"Notre Dame Cathedral"
});
// add listener to change panorama options when the marker is clicked
google.maps.event.addListener(markerNotreDame, 'click', function() {
panorama.setPosition(positionNotreDame);
panorama.setPov({heading: 140, pitch: +10, zoom: 1});
});
// on panorama
var markerNotreDamePanorama = new google.maps.Marker({
position: positionNotreDame,
map: panorama,
title: 'Notre Dame Cathedral'
});
// add louvre marker
// on map
var positionLouvre = new google.maps.LatLng(48.862266,2.336728);
var markerLouvre = new google.maps.Marker({
position: positionLouvre,
map: map,
title:"Louvre Museum"
});
// add listener to change panorama options when the marker is clicked
google.maps.event.addListener(markerLouvre, 'click', function() {
panorama.setPosition(positionLouvre);
panorama.setPov({heading: 230, pitch: +10, zoom: 1});
});
// on panorama
var markerLouvrePanorama = new google.maps.Marker({
position: positionLouvre,
map: panorama,
title: 'Louvre Museum'
});
}
We first defined the coordinates for the center of the map (we centered the map near the Eiffel tower). We also set the options for the map:
var mapOptions = {
center: mapCenter,
zoom: 12,
mapTypeId: google.maps.MapTypeId.ROADMAP,
streetViewControl: true
};
We have set the map center, zoom level, type and we have set the streetViewControl to true. This means a small pegman will be shown on the left of the map. By dragging it on different places on the map we can change the view in the streetview.
All we have to do now in order to show the map is create a new map object.
map = new google.maps.Map(document.getElementById("map_canvas1"), mapOptions);
For showing the street view next to the map, we have to follow similar steps. We first have to set the options for the panorama:
// options for the panorama
panoramaOptions = {
addressControl: true,
addressControlOptions: {
style: {backgroundColor: 'grey', color: 'yellow'}
},
position: mapCenter,
pov: {
heading: 140,
pitch: +10,
zoom: 1
}
};
The addresscontrol is a small box that shows the address of the viewed location. We have set the background color and text color for it. We have defined the position of the panorama (same as the map center). And we have defined the point of view for the panorama. For the point of view, we can define the heading (the rotation angle of the camera locus), pitch (the angle variance “up” or “down”) and zoom (zoom level of the view).
After setting the parameters, we have to create a new streetviewpanorama object and set the streetview of the map. Like this:
// show the panorama in the map_canvas2 div element with the options that were set
panorama = new google.maps.StreetViewPanorama(document.getElementById("map_canvas2"), panoramaOptions);
// set street view for map
map.setStreetView(panorama);
We will also add some markers for a few places to visit. We will add markers on the map and on the streetview (yes, we can place markers on them). Here’s the code for showing a marker (for the tour Eiffel marker; the others are the same, just the location is set to some other coordinates):
// add marker for tour eiffel
// on map
var marker = new google.maps.Marker({
position: mapCenter,
map: map,
title:"Paris visit starts here!"
});
// on panorama
var markerPanorama = new google.maps.Marker({
position: mapCenter,
map: panorama,
title: 'Tour Eiffel'
});
For each marker we have set the position, the map where is appears and a title.
There’s one more thing we need to do. We want the streetview to change when a user clicks on a marker on the map. For this, we have to add an event for when a user clicks on a marker and change the position and point of view of the panorama then.
google.maps.event.addListener(marker, 'click', function() {
panorama.setPosition(mapCenter);
panorama.setPov({heading: 140, pitch: +10, zoom: 1});
});
I chose the values for the point of view in order for the panorama to focus on the building to visit.
So we now have a map of Paris and a street view panorama. The virtual visitors can use the pegman on the map to change the streetview and visit different sites. They can also move using the streetview panorama and “walk” through Paris. To view certain locations, they can use the markers we placed on the map. The only thing we have to add to our app is the tour of the islands. Here’s how it will work: when the user presses on the “take tour” button, the tour is shown on the map, the panorama is centered on the start point of the tour (in front on the Notre Dame cathedral) and the steps of the tour are shown in the right panel. To take the tour, the user has to click on the steps in the right. When they click, the panorama will change and show the current location. To show the steps we will use the directions service.
Here’s the function that is called when the “take tour” button is pressed:
// function called when the island visit button is pressed;
function visitIslands()
{
// centers the map on the island and zooms it
var newMapCenter = new google.maps.LatLng(48.853372,2.350718);
map.setCenter(newMapCenter);
map.setZoom(14);
// add some points for the tour
var route1 = new google.maps.LatLng(48.853499,2.348090);//notre dame
var route2 = new google.maps.LatLng(48.854191,2.347457);
var route3 = new google.maps.LatLng(48.855659,2.348272);
var route4 = new google.maps.LatLng(48.856916,2.343434);
var route5 = new google.maps.LatLng(48.854370,2.344935);
var route6 = new google.maps.LatLng(48.852799,2.353309);
var route7 = new google.maps.LatLng(48.850647,2.357531);
var route8 = new google.maps.LatLng(48.851875,2.358626);
var route9 = new google.maps.LatLng(48.855038,2.350171);
// set the position for the street view - the first point in the tour
panorama.setPosition(route1);
// create DirectionsService object
directionsService = new google.maps.DirectionsService();
// set options for renderer
var rendererOptions = {
map: map
};
// create DirectionsRenderer object for showing the route directions
directionsDisplay = new google.maps.DirectionsRenderer(rendererOptions);
// the request for the directionsservice
var request = {
origin: route1, // tour start
destination: route9, // tour end
waypoints: [ // waypoints: adding the points for the tour
{
location: route2,
stopover: false
},{
location: route3,
stopover: false
},{
location: route4,
stopover: false
},{
location: route5,
stopover: false
},{
location: route6,
stopover: false
},{
location: route7,
stopover: false
},{
location: route8,
stopover: false
}],
provideRouteAlternatives: false, // don't look for alternative routes
travelMode: google.maps.DirectionsTravelMode.WALKING // travel mode set to walking
};
// make request to directions service
directionsService.route(request, function(result, status) {
if (status == google.maps.DirectionsStatus.OK)
{
// display the route on the map
directionsDisplay.setDirections(result);
// get routes array
var myRoute = result.routes[0];
// create the text to show in the right panel
var text = "
Notre Dame Cathedral -> Quai aux Fleurs
text += "
Instructions:
";
text += "
Click on the instructions to view panorama!
";
// find the instructions for the route and show then in the right panel
for (var i=0; i
// show them as links, when they are clicked call the movePan function (parameter latitude and longitude for the start of the step)
text += "
"+myRoute.legs[0].steps[i].instructions+"";
}
// show the text on the page
document.getElementById('directions').innerHTML = text;
}
});
}
Let’s see what it does. First, we center the map on the islands and zoom the map. Then, we define some points on the tour route. We also set the position of the panorama to the start point. And now, we’ll use the directions service to find the route.
We create the directionsservice object and a renderer to display the route on the map.
// create DirectionsService object
directionsService = new google.maps.DirectionsService();
// set options for renderer
var rendererOptions = {
map: map
};
// create DirectionsRenderer object for showing the route directions
directionsDisplay = new google.maps.DirectionsRenderer(rendererOptions);
Then we create a request for the directions service. We set the origin and destination of the desired route. We also set the other points we defined for the route as waypoints (the route returned by the directions service from google will have to pass through these waypoints). We instruct the service to not look for alternative routes and use the walking travel mode.
// the request for the directionsservice
var request = {
origin: route1, // tour start
destination: route9, // tour end
waypoints: [ // waypoints: adding the points for the tour
{
location: route2,
stopover: false
},{
location: route3,
stopover: false
},{
location: route4,
stopover: false
},{
location: route5,
stopover: false
},{
location: route6,
stopover: false
},{
location: route7,
stopover: false
},{
location: route8,
stopover: false
}],
provideRouteAlternatives: false, // don't look for alternative routes
travelMode: google.maps.DirectionsTravelMode.WALKING // travel mode set to walking
};
We now have to make the request to the service and, when the result is received show the route on the map and the steps in the panel in the right.
// make request to directions service
directionsService.route(request, function(result, status) {
if (status == google.maps.DirectionsStatus.OK)
{
// display the route on the map
directionsDisplay.setDirections(result);
// get routes array
var myRoute = result.routes[0];
// create the text to show in the right panel
var text = "
Notre Dame Cathedral -> Quai aux Fleurs
text += "
Instructions:
";
text += "
Click on the instructions to view panorama!
";
// find the instructions for the route and show then in the right panel
for (var i=0; i
// show them as links, when they are clicked call the movePan function (parameter latitude and longitude for the start of the step)
text += "
"+myRoute.legs[0].steps[i].instructions+"";
}
// show the text on the page
document.getElementById('directions').innerHTML = text;
}
});
We have used the display renderer to show the route on the map. We also got the instruction for each step of the route and shown them in the right panel. As you can see, the movePan function is called when the steps are clicked on. The function takes the coordinates of the step as parameters.
// called when the links with the tour directions are clicked
function movePan(lat, lng)
{
// modify the position of the street view panorama
panorama.setPosition(new google.maps.LatLng(lat, lng));
}
The only thing it does is set the position for the panorama.
And we’re done! We now know how to include streetviews in our apps!
If you have any questions or comments, don’t hesitate to ask!
- Login om te reageren