Create Demo: An Easy Way To Present Adobe Fireworks Design Prototypes

 |
With its structured approach to organizing assets, Adobe Fireworks can be a pleasure for designing and prototyping. But demonstrating your designs on a wide range of devices can be time-consuming and could even require some degree of coding.
The Create Demo extension addresses some of these issues. It automatically converts your Fireworks documents into portable presentations, which can then be easily presented in any browser — desktop or mobile.
Overview
Why Is It Needed?
This extension makes the process of preparing and exporting your Fireworks PNG files as presentations quick and painless. It can be used to show multi-page website prototypes, designs and sets of slides.
The only thing you will need to think about is where to upload the presentation (i.e. whether to present it online or on your iOS or Android device). The generated slideshows will render identically on all devices, with automatic thumbnail navigation.
A Bit Of Background
The “Demo Current Document” used to be a great feature in Fireworks that I often used to show off website concepts and designs to clients. Unfortunately, its reliance on Flash and the success of the iOS and Android platforms means that, today, it cannot be used to reliably present your ideas on every screen and in every situation. We needed to move from Flash to a pure HTML solution if we wanted to have full cross-browser and cross-platform support.
Having read Viktor Goltvyanitsa’s excellent article about the making of the original extension and knowing what can be achieved today with the capabilities of modern browsers, we knew it was time to accept the challenge. This is how the Create Demo extension was conceived (you can read more on our blog).
Installation And Requirements
The extension works with Adobe Fireworks CS3 or later and has been tested extensively on both Mac and Windows platforms.
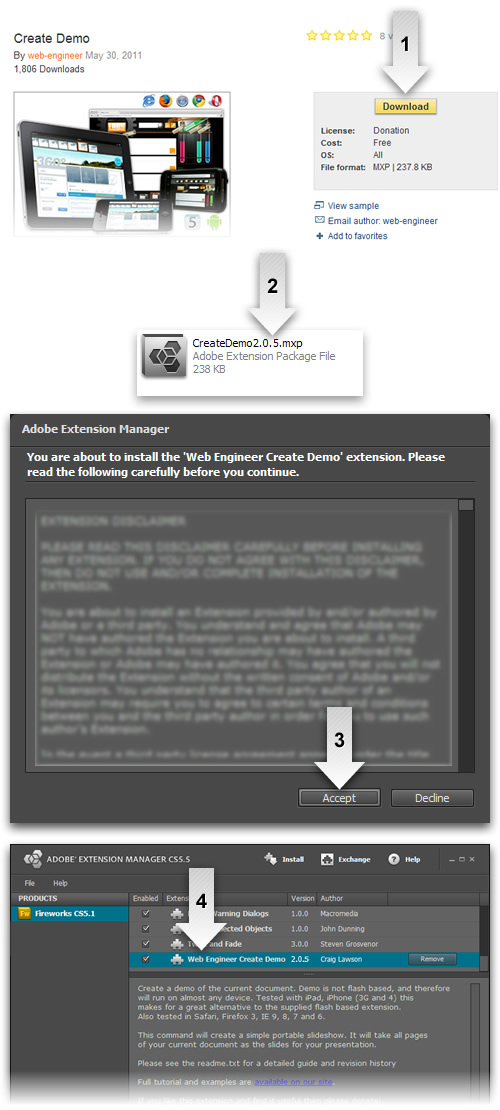
- Download Create Demo from Adobe Exchange. The extension is free, but you’ll need an Adobe ID in order to download it (if you’ve ever downloaded Adobe software — Fireworks, for example — then you likely already have an ID).
- When download is complete, simply double-click the
CreateDemo2.0.5.mxpfile. - Click on “Accept” when the Adobe Extension Manager opens.
- If installation was successful, you’ll see Create Demo listed in the Extension Manager list.

Installation steps.
Advice to Windows 7, Windows 8 and Vista users: run the Adobe Extension Manager as Administrator to prevent any errors during installation.
Supported Browsers and Platforms
The exported demo files generated by this extension have been tested on a variety of platforms and browsers, including iOS, Android, Windows, Linux and Mac OS X. Tested browsers include Safari, Firefox, Chrome, Opera and Internet Explorer.
How Much Does the Extension Cost?
The extension is absolutely free for everyone and is licensed as “donation-ware”; the only limitation of the free version is a small credit that appears at the startup of every presentation. If you decide to contribute, you’ll have the option to remove this screen, and we’ll personalize the interface with your name (you can choose how much — or how little — to donate, starting from only £5).

Licensed version (personalized).
Last-minute note: If you are a CS6 user, you should know that the process of obtaining and managing your extensions is currently being overhauled. To ensure that we can continue to support and provide updates in the future, we have put the extension in the new Adobe Exchange panel. For detailed information on installing the extensions using this panel, see our detailed blog entry about it.
Create Demo: How To Use It
Basic Use
Once the Create Demo extension is installed, you can access it from the menu: Commands → Web Engineer → Create Demo.
The extension’s interface is grouped into two key sections: settings and pages. Settings can be customized on a per-document basis, so if you change them, you will need to save your Fireworks document to ensure they are not lost.

The key sections of the Create Demo extension: settings and pages.
Settings section
The settings panel groups the common general options for exporting your demo. The current version (2.0.5) gives you the following options:
- Stage
The color of the area outside your slide. - Highlight
The color of the highlight applied to the selected slide’s thumbnail. - Max thumb size
The width and height of the bounding box within which your slide’s thumbnails will be sized to fit. The thumbnail’s size is not limited, however, for best results, use a thumbnail size that fits your target device. - Auto-hide thumbs
An option to hide thumbnails automatically (handy for slideshows). - Click left side to go back
Navigate both forwards and backwards through the slideshow depending on where you click. When not enabled, a click always advances you forward. - Shadow
Adds a CSS-based shadow to your slide (ideal for presenting photos). - Show splash screen (licensed version only)
Removes the splash graphic on launch. - Use export settings
This will respect the export settings specified in your Fw PNG document. If unchecked, the slides will be exported as high-quality JPEG files. - Use HTML5 cache
Enables your slides to be cached for offline browsing. - Enable gestures
An option to use gestures (flicks) on mobile devices to advance the slides and to show and hide the thumbnails. This works well on touchscreen devices that support it, but the feature is optional and not enabled by default. If you want to experiment, an explanation of the handling of gestures is featured in the third example. - Auto-advance
When set to a non-zero value, this is the delay in milliseconds before the next slide is shown (note that an interaction will restart the timer). 1000 milliseconds equals 1 second, so be sure to input a large enough value.
Pages section
The pages section shows which pages will be exported from your Fireworks document. Simply clicking on a page name will toggle its inclusion.

Fireworks’ Pages panel (left), and Create Demo page selection (right).
One of most valuable Fireworks features for Web and mobile designers is pages. Pages essentially enable you to capture your design concepts in one document, with the help of shared layers, states and symbols. The Create Demo extension relies on the pages feature in Fireworks when it prepares your design for exporting as a multi-page presentation.
The Pages panel is usually located to the right of the Fireworks workspace, docked with the Layers panel. If it’s not open, press F5 or go to Window → Pages.
A Note on Locations (for Exported Presentations)
- If you create a new Fireworks PNG file, save it somewhere in your computer, and run Create Demo, then the extension will suggest to save the presentation in the same location where the Fw PNG file is currently located.
- If you create a new Fireworks PNG file, save it somewhere in your computer (let’s call it location “A”), export it via
File → Export… orFile → Export Preview… (location “B”), and run Create Demo, then the extension will suggest to save the presentation to location “B” (and not where the Fw PNG file is located).
This is by design and could save you a few mouse clicks as you prepare your presentation!
Practical Examples
The following series of examples demonstrate the key features of Create Demo. The first slide in each example also shows the settings that were used to create it.

Example 1: This is a demo of a website prototype. The page shadow has been turned off, and the background is set to “match.”

Example 2: In this demo, the images have been framed with a shadow; large thumbnails have been chosen; and the “auto-hide” option is enabled (i.e. if you don’t interact with the mouse, the thumbnails will be hidden after a short delay).

Example 3: This example demonstrates some of the features added in the 2.x release, focusing on HTML5 enhancements (including caching and better device support).
Touch, Keyboard Keys and Mouse
Featuring keyboard control, mouse control and gesture support (iOS only), Create Demo makes navigating your pages both swift and smooth.

Keyboard controls (overview).
You can show and hide thumbnails of your pages for quick navigation. Images are handled with care, with a focus on presenting them efficiently and elegantly. Thumbnails are centered in the view, giving quick access to adjacent pages (making it similar to how Flickr’s navigation works). With a few clicks you can flip through a large number of slides, if the size you selected for the thumbnails is reasonable.
Create Demo: In More Detail
How It Works
The slideshows are created using nothing more than HTML and JavaScript. Create Demo produces configuration files, a manifest file (if the content caching option has been enabled), images, and the script required to create a versatile presentation that will run on a wide variety of devices.
Manifest is part of the HTML5 standard:
The cache manifest in HTML5 is a software storage feature which provides the ability to access a web application even without a network connection.
Simply put, it gives the browser the complete list of resources that are required to store pages locally. It is associated with the presentation in the HTML by adding the manifest attribute to the document. For example:
…
The manifest file itself contains the list of resources, which might require you to configure your server to add the manifest MIME type. For those using Apache, a configuration file is automatically exported with your files.
To learn more about the application cache, HTML5 Rocks has a good introduction. To ensure that users see your latest presentation when the content cache is enabled, clear the browser’s cache or upload the presentation to a new URL.
You can also link to specific pages directly in your presentation simply by adding #X to the end of the URL, where X is the page number that you want the presentation to jump to. This can be extremely useful when you want to email a series of links and annotations to a client to explain a prototype in more detail.
Adapts to the Device
The presentation will adapt to the device (whether desktop or mobile) on which it is being viewed. Depending on the capabilities of the device, the presentation will make the best use of what is available. On the desktop, the fixed positioning helps to keep the thumbnails placed nicely at the bottom of your slideshow, and by adding a margin to the bottom of the page, none of your presentation images will be obscured.
When viewing the presentation on a mobile device, the thumbnails are moved to the top of the screen for easier navigation. The pages are not downscaled to fit the size of the screen, since mobile browsers usually have excellent zoom and pan functionality.

Mobile view (left) versus desktop view (right).
iOS Application Mode
The presentations created by the Create Demo extension fully support iOS’ application mode. By simply supplying a page with a given name and dimensions, you can automatically export icons and the startup screen directly from your Fireworks file. For icons, simply set the page name to the icon size in pixels, prefixed with @ (currently, 57, 72 and 114 pixel sizes are supported). For the startup page, name the page @startup, and it should match the standard startup image size of 320 × 460 pixels. For a full explanation and example of this in action, see the third practical example.
Known Issues
The extension has had a number of updates. I plan to develop and improve it further in the future.
Currently, only a few limitations are known:
- If Google Chrome is your default browser on OS X, then when you launch the presentation as an export from Fireworks, the browser ends up with an extra
/in the URL. I believe this is a known issue with Fireworks (and will hopefully be fixed in a future release by Adobe). - Gesture support for Android has been removed due to issues with scrolling. Touch and gesture support will likely be reviewed and updated in future releases of the extension.
- The current exporting format is not suitable for large presentations (i.e. large images), but whether this should be supported at all is questionable.
Download A Fireworks PNG Template For iOS
I have created a simple template containing icons and a startup screen. It contains four pages and provides a handy starting pointy for creating your presentations. The icons all share the same symbol, so they can be edited in one place, with the rest updating automatically. The icons and startup images are named and sized correctly and will automatically be converted on export (although that they won’t be shown as pages included in the output of the final presentation). This demo does not include a design concept because it’s meant to be a starter file.

Download the template Fireworks PNG file (ZIP, 650 KB).
After downloading, simply unzip the file, and open it in Fireworks. You can then assemble your presentation, add and edit pages, and customize the icons. This template is not required by the extension; it’s intended merely to save you a little time when you want to quickly create the full set of iOS icons and a startup screen.
Note: You’ll need to first add pages to the Fw PNG template; after that you can run the extension.
If you no pages are in your document (other than the icons and the splash screen) and you try to export the demo, you’ll see a warning, and a blank index.html file will open.

This message will appear if you try to create the presentation without having actual pages in the Fw PNG document.
Quick Demo
This very simple example of a presentation was automatically created with the help of the iOS Fw PNG template. It contains three content pages, navigation with thumbnails, an iOS startup page and three icons.

Click the link (or scan the image using your mobile device) to view the demo.
Conclusion
I’ve attempted to keep this extension robust in order to solve a simple problem, which is to quickly and reliably present multi-page Fireworks designs on any device. The key was to make it easy to use; it shouldn’t leave you puzzled and desperately looking for a manual. We’ve found this extension to work well for our team, and I hope it works well for you, too.
You can follow the Adobe Fireworks Exchange for update notifications. I’d also love to see how this is being used, and we welcome feedback and comments. You can also follow me on Twitter for the latest updates.
Feedback
Have an idea for improvement or a new feature? Found a bug? Don’t hesitate to contact us or leave a comment here.
(al) (mb)
© Craig Lawson for Smashing Magazine, 2013.

- Login om te reageren


